
TreeGrow's Tree Window Tools
The TreeGrow Tree Window provides a variety of different tools which you can use to manipulate the tree structure and to attach properties to the nodes in your tree. Note that some toolbar buttons represent both a primary and a secondary tool. In this case, you can access the secondary tool by holding down the modifier key. Be sure to keep this key pressed the entire time you are using the secondary tool.
Click on the tool you want to learn about:


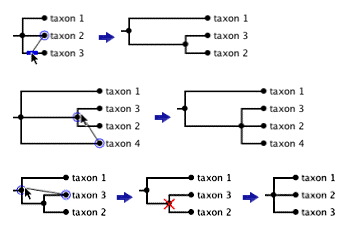
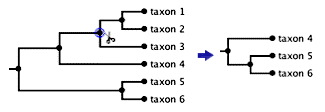
Move Branch
Use this tool to move branches in the tree.
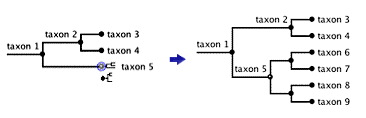
Click on the node you want to move and drag it to the branch of its desired sister group OR drag it on the node of its desired parent group.
Sometimes a branch move will make it necessary that certain nodes in the tree are collapsed. If this is the case, the node(s) to be deleted will be marked with a red X before they disappear.
You can also use this tool to rotate branches.

Click on a node, and the order of the branches for the immediate subgroups will reverse. For a dichotomy, the order of the two subgroups will flip. For a polytomy, the first group will become the last group, i.e., 1-2-3-4, will become 4-3-2-1.
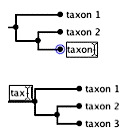
Name Node
This tool allows you to enter the name for a node on the tree.
When you click to the right of a terminal node or to the left of an internal node, a text box will appear where you can enter the name. When you are done, hit return or click the mouse elsewhere in the Tree Window, and your entry will be accepted.
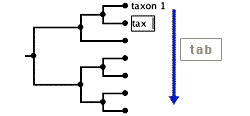
Tip 1: You can quickly move down the text boxes of terminal nodes by using the tab key.
Tip 2: You do not always have to select the Name
Node tool when you want to enter the name of a node. The text
boxes to the right of terminal nodes and to the left of internal nodes
will also become active when you click on the relevant areas with
the Move Branch
and Add Subgroup ,
tools selected.
Add Subgroup
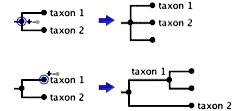
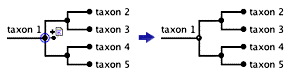
Use this tool to add a new subgroup to your tree.
Click on the node to which you want to add subgroups. If the parent node already has descendants, one new subgroup will be added.
In the ToL system, internal nodes must always have at least two descendants. Therefore, two new subgroups will be added, if the parent node does not yet have any subgroups.
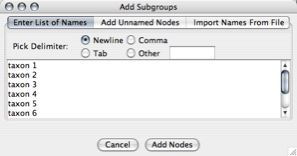
Add Multiple Subgroups
Use this tool to add multiple subgroups with a single action.
When you use the tool to click on a node, a window opens that gives you three options:
- Enter a list of names to be assigned to the new subgroups. Here you can copy and paste a list of taxa from a word processor or an analysis program. You also need to indicate the delimiter that separates individual taxon names.
- Add a given number of unnamed nodes.
- Import names from a hierarchically structured file.
New nodes entered through the first two options will be added in a
single polytomy. You can then give this subtree structure by using
the Move Branch tool .
Delete Node

Use this tool to delete a node, i.e., to collapse a single branch in the tree.
The node to be deleted will be marked with a red X before the branch is collapsed.
You cannot use this tool on a node that has a page attached to it. The page has to be removed before the node can be deleted.
Please be careful when deleting nodes or pages. Don't delete pages that other people have created unless you are sure their content is obsolete. If you want to reorganize an existing branch of the ToL, it's best to rename nodes rather than deleting them and starting from scratch. This is because nodes that have been uploaded to the ToL database may have images or other media attached to them. Renaming the node will preserve these attachments; however, if a node is deleted, attached media objects will automatically be moved to the nearest parent node and will then have to be attached manually to the newly created replacement nodes.
TreeGrow will initially balk at deleting a node. It will open a window with a message warning you about the consequences of deleting nodes. You then have to check the "Don't Show This Message Again" box before being able to proceed with the deletion. Once you have checked this box, you will be able to delete additional nodes during a given session without having to look at the message again.
Delete Group
Use this tool to delete a node and all of its descendant nodes.
You cannot use this tool if the following is true for any of the nodes to be deleted:
- A node has a page attached to it. The page has to be removed before the node can be deleted.
- A node has descendants beyond the current download, i.e., a node
is marked by a subtree icon
 .
You can only delete nodes that you have downloaded.
.
You can only delete nodes that you have downloaded.
Please be careful when deleting nodes or pages. Don't delete pages that other people have created unless you are sure their content is obsolete. If you want to reorganize an existing branch of the ToL, it's best to rename nodes rather than deleting them and starting from scratch. This is because nodes that have been uploaded to the ToL database may have images or other media attached to them. Renaming the node will preserve these attachments; however, if a node is deleted, attached media objects will automatically be moved to the nearest parent node and will then have to be attached manually to the newly created replacement nodes.
TreeGrow will initially balk at deleting a node. It will open a window with a message warning you about the consequences of deleting nodes. You then have to check the "Don't Show This Message Again" box before being able to proceed with the deletion. Once you have checked this box, you will be able to delete additional nodes during a given session without having to look at the message again.
Collapse All
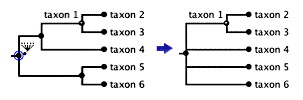
Use this tool to collapse the descendants of a node into a polytomy.
When you click on a node, descendant nodes are collapsed until one of the following is reached:
- a node that is terminal in the current download
- a node that has a page attached to it.
In the Tree Window, such nodes are marked with a white dot .
.
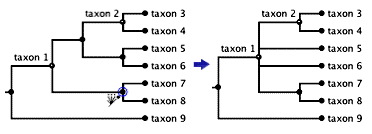
Use this tool to collapse all branches below a given node into a polytomy.
When you click on a node, this node's parent nodes and their descendants are collapsed until one of the following is reached:
- the root of the current download
- a node that has a page attached to it.
In the Tree Window, such nodes are marked with a white dot.
Fetch Subgroup
Use this tool to download additional subgroups, one at a time, from the Tree of Life database.
To use this tool, you need to be connected to the internet. Also, this
tool will work only if information associated with a particular subgroup
is already contained in the Tree of Life database. Terminal nodes
that can be downloaded are characterized in the Tree
Window by a small subtree icon .
To download the information associated with a particular subgroup, simply click on the relevant node with the Fetch Subgroup tool. You may then have to wait a few seconds for TreeGrow to finish the downloading process.
Add Page
This tool allows you to add a page to a node.
You can use this tool to quickly set up the page structure for your
subtree. In the Tree Window, nodes with pages
are marked with a white dot .
In order to add content to individual pages, you will then have to
use the Edit Online tool .
This tool allows you to remove a page from a node.
Please be careful when deleting pages. Don't delete pages that other
people have created unless you are sure their content is obsolete.
In order to make sure you are not deleting any valuable content by
removing a page, please first check the content of the page you are
removing. You can do this easily by clicking on the Edit Online
tool .
TreeGrow will initially balk at deleting a page. It will open a window with a message warning you about the consequences of deleting pages. You then have to check the "Don't Show This Message Again" box before being able to proceed with the deletion. Once you have checked this box, you will be able to delete additional pages during a given session without having to look at the message again.
Edit Online
Use this tool to edit the page and other data for a node online, using the ToL Web Tools.
When you click on a node that has a page attached to it, your default web browser will launch, and the page will load on the ToL Development Site, featuring a variety of links for editing taxon names, text sections, author information, etc.
Leaf Node
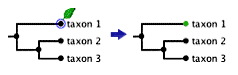
Use this tool to mark terminal nodes on the tree.
Marked nodes are then shown in the Tree Window
with a green color:  .
Clicking with this tool on a node toggles the leaf node mark on and
off.
.
Clicking with this tool on a node toggles the leaf node mark on and
off.
Terminal nodes are those nodes that are not expected to have any subgroups on the Tree of Life. Usually, these will be nodes for individual species, but authors can also decide to erect leaf nodes for subspecies or other taxonomic categories. Of course, species nodes that have subspecies descendents are not leaf nodes, because they are not terminal on the Tree of Life.
TreeGrow will let you apply the leaf node mark only to terminal nodes in the tree. The Leaf Node tool will not work on nodes that have subgroups. And adding subgroups to a node will automatically turn off the leaf property.
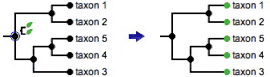
You can use this tool to mark all the terminal nodes descending from a given node as leaves.
When you click on a node with this tools selected, all descendant nodes that are included in the current download and that do not have any descendants themselves will be marked as leaf nodes.
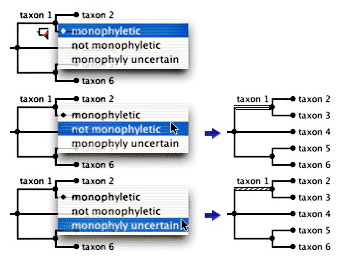
Phylesis
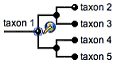
Use this tool to mark groups that are not monophyletic, or groups for which monophyly is uncertain.
When you click on a node with the Phylesis tool selected, a menu with three options appears. By default, branches in the tree are set to be monophyletic. If you select not monophyletic or monophyly uncertain, the pattern of the branch leading to the affected node will change to indicate its special phyletic property. Also, when you mouseover a patterned branch in a tree diagram on a branch page on the ToL web site, a brief explanation of the property will appear providing a link to a more detailed explanation.
Generally, clearly non-monophyletic groups should be avoided in the Tree of Life. However, for some groups where there are many taxa, and relationships are poorly resolved, the grouping together of taxa into preliminary, non-monophyletic groups is the only practical way for the time being.
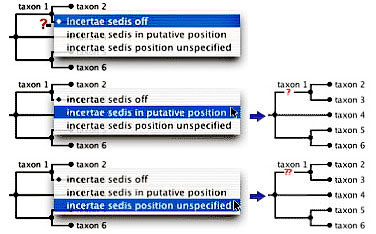
Confidence of Placement
Use this tool to mark groups of uncertain phylogenetic placement.
When you click on a node with the Confidence of Placement tool selected, a menu with three options appears. By default, branches in the tree are set to incertae sedis off. If you select incertae sedis in putative position or incertae sedis position unspecified, the pattern of the branch leading to the affected node will change to indicate its special confidence of placement property.
If you select incertae sedis in putative position, the branch leading to the node will be marked with a question mark on the ToL page for the containing group. If you select incertae sedis position unspecified, the group will be clipped from its position and shown below the tree on the ToL page for the containing group. Also, when you mouseover an incertae sedis branch on a web page, a brief explanation of the property will appear providing a link to a more detailed explanation.
Please note that incertae sedis position unspecified nodes are subject to restrictions with respect to their position in the tree. This is because they are not truly part of the tree structure but are placed in a given position only provisionally. Since such nodes are not valid descendents of their provisional parent nodes, incertae sedis position unspecified nodes always need to have at least two sibling nodes; i. e., they need to be placed within a polytomy rather than a dichotomy.
Extinct Node

Use this tool to mark groups that are extinct.
Marked nodes are then shown in the Tree Window
with a dagger icon:  .
Clicking with this tool on a node toggles the extinct node mark on
and off.
.
Clicking with this tool on a node toggles the extinct node mark on
and off.
Please remember that extinct nodes cannot have any descendents which are not extinct. The descendents of extinct groups will automatically be marked as extinct.
Subgroups Incomplete

Use this tool to mark groups for which the list of subgroups is still incomplete.
Marked nodes are then shown in red in the Tree Window:  .
Clicking with this tool on a node toggles the incomplete mark on
and off.
.
Clicking with this tool on a node toggles the incomplete mark on
and off.
Using the Subgroups Incomplete tool to mark nodes which for which we do not yet have all known descendents helps us to keep track of such groups in the ToL database. Also, if you mark a group in this way, the following comment will automatically be printed below the tree or taxon list on the page that's attached to the marked node:
Note: this taxon list is still under construction. It does not yet contain all known [groupname] subgroups.
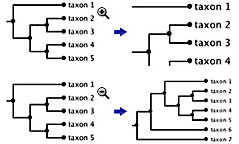
Zoom In
Use this tool to get a closer look at any given part of the tree.
Zoom Out
Use this tool to get a better look at the overall tree structure.

Move Tree
With this tool you can grab the tree and move it around in the Tree Window.
Move the cursor to the part of the tree that you would like to use as a handle. Click and hold down the mouse while dragging the tree to its desired position.
Undo
Clicking on this tool will undo your past actions one at a time. You won't be able to undo individual actions after uploading material to the server or after closing a file.
Redo
Clicking on this tool will redo actions that had been undone. You won't be able to redo actions after uploading material to the server or after closing a file.
* Modifier keys for the Tree Window tools:
| Linux | Mac | Windows |
|---|---|---|
| ctrl | option | alt |