
Quickstart Tutorial: Building Your First Page
This tutorial provides a brief introduction to the process of contributing branch or leaf pages to the Tree of Life web project. It will give you the tools to build a draft for your first ToL page within less than an hour. Once you have mastered the basic process of page construction, you can refer to the Technical Reference or to the instructions embedded in the editing forms for additional information and in-depth descriptions of individual features.
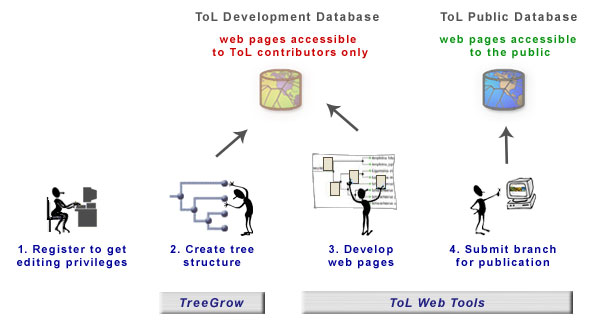
A brief overview of the ToL page development process: (1) Upon registration as a ToL scientific core contributor, you are assigned editing privileges for one or more groups of the Tree of Life. (2) You will then build the structure for your branch using TreeGrow, the ToL tree creation/manipulation software. Once you have uploaded the structure for your branch to the ToL Development Database, (3) you can start to develop branch and leaf pages using the ToL Web Tools. During the development process, you can view your work on a web site that is accessible only to ToL contributors and their collaborators. (4) When you submit your branch for publication, a ToL editor will review the page(s). Upon editorial approval, the data are copied to the ToL Public Database, and your new or revised page(s) will be accessible to visitors of the public ToL website.
To teach you the use of TreeGrow and the ToL Web Tools, we will go through the process of building a tree structure and a branch page for the Critteridae, a fictitious group of organisms. We encourage you to follow along the steps described here when you develop a page for your own group. (You will not be able to actually download and edit the Critteridae, because you do not have editing privileges for this group.) Whenever we talk about doing something with the Critteridae, simply do something similar in your own group. You can preview the finished Critteridae draft page here.
Below, we will take the following steps to construct and publish the Critteridae branch page:
- Step 1: Register as a ToL contributor and get editing privileges for the ToL Critteridae.
- Step 2: Use TreeGrow
to build the tree structure for the Critteridae branch.
- Download and instal TreeGrow.
- Use TreeGrow to download the Critteridae branch to your computer.
- Add subgroups, set node properties, and create the phylogenetic structure for the group.
- Upload the Critteridae tree structure to the ToL database.
- Step 3: Use the ToL
Web Tools to develop the Critteridae branch page.
- Create a text section.
- Add author information.
- Add title illustrations.
- Step 4: Submit the Critteridae branch for publication.
Some ToL contributors may be able to take a shortcut and skip through instructions that are not relevant for them:
- If you are already a registered ToL contributor and have been assigned editing privileges for your group in the ToL database. You can go straight to Step 2. (Check with if you are not sure.)
- If you are not creating a new ToL branch from scratch; i. e., if you are going to edit an existing ToL page, or if you are going to add a new page for a group that is already represented in a tree or taxon list on the ToL web site, you can skip Step 2 and go straight from Step 1 to Step 3.
Step 1: Register as a ToL Contributor
Before you can begin working on your ToL pages, you must first get registered as Tree of Life scientific core contributor. Upon registration, you will get a group assignment, which is determined by a ToL editor in consultation with you and the coordinators for relevant groups. A group assignment entails editing privileges for the tree structure of a given branch and for the pages attached to the nodes in the branch. You will be given a personal username (the email address you provide) and password for working with TreeGrow and the ToL Web Tools.
Step 2: Build the Tree Structure for Your Branch
Getting Started with TreeGrow
When you register as a ToL contributor, you will also receive a username and password for downloading TreeGrow, the ToL tree editing application. (Unfortunately, this username and password combination has to be different from the personal username and password you use when working with TreeGrow and the ToL Web Tools.) Installation instructions for different operating systems are available on the Download TreeGrow page.
Once you have downloaded and installed TreeGrow,
you can launch the application and log in with your personal
username and password. This authentication is only necessary the first
time you launch TreeGrow, since the application
will remember these data for you. Once you are logged in, you are presented
with the TreeGrow Manager. The first thing you need to do is
download the branch you want to work on. A branch can only be downloaded
if it is represented by a node that has a page attached to it in the Tree
of Life development database. If the page for your node is not yet in
the database, you will need to contact
to have it added.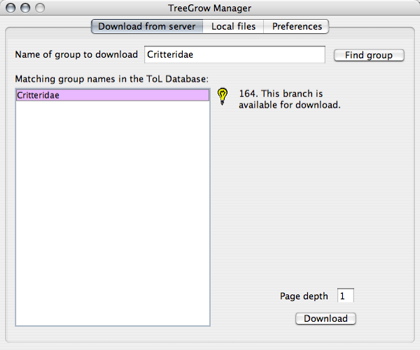
In the Download from server panel of the TreeGrow Manager, enter Critteridae (substitute your assigned group here) in the search field and select Find Group. TreeGrow now contacts the Tree of Life development database and returns the names of all nodes matching your search criteria. In this case, it finds only one: Critteridae, which you download by pressing the Download button at the bottom.
Note: When you download a branch in TreeGrow, you check it out from the ToL database. This process is analogous to checking out a book from a library: the tree structure and node properties of a branch can only be in the possession of one user at a time; i. e., to prevent conflicting changes from multiple users, downloading a branch will lock it for other contributors who may have access privileges (e. g., co-authors or a ToL editor or coordinator). In order to make a given piece of the tree available for other contributors to download and develop, you need to check the branch back in when you are done editing it. You can do this simply by selecting Check in file from TreeGrow's File menu.
Building the Tree Structure
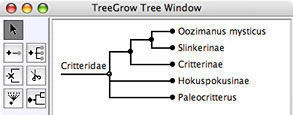
When you click on the Download button in TreeGrow's
Download from server panel, the Tree Window will now
open showing a single node, Critteridae. (If you download
a ToL branch that has already been developed, there will be more nodes.)
In order to populate the tree with subgroups, you select the Add Subgroup
tool  .
You will add 5 subgroups, so you click on the Critteridae node 4 times
(the first click automatically adds two subgroups);
then you name each subgroup by clicking to the right of each node and
typing in the name. You now have a parent node, Critteridae, with 5 named
subgroups. (Note: you can also add a bunch of subgroups
in one swoop using the Add
Multiple Subgroups
.
You will add 5 subgroups, so you click on the Critteridae node 4 times
(the first click automatically adds two subgroups);
then you name each subgroup by clicking to the right of each node and
typing in the name. You now have a parent node, Critteridae, with 5 named
subgroups. (Note: you can also add a bunch of subgroups
in one swoop using the Add
Multiple Subgroups  tool).

 The next step is to develop the branching structure of the tree. With
the Move Branch tool
The next step is to develop the branching structure of the tree. With
the Move Branch tool  selected, drag nodes to the branches of their sister groups (e.g.
drag the Slinkerinae node to the Oozimanus mysticus
branch, then drag the Critterinae branch to the root of Slinkerinae +
Oozimanus mysticus, etc.) To form a polytomy,
drag a node to the parent node for the polytomy. For this example, your
final tree will be only partially resolved and will contain one polytomy:
selected, drag nodes to the branches of their sister groups (e.g.
drag the Slinkerinae node to the Oozimanus mysticus
branch, then drag the Critterinae branch to the root of Slinkerinae +
Oozimanus mysticus, etc.) To form a polytomy,
drag a node to the parent node for the polytomy. For this example, your
final tree will be only partially resolved and will contain one polytomy:
One of your terminal taxa (Oozimanus mysticus)
is a species, so you designate it as a leaf node by selecting the Leaf
Node tool  and clicking on the node. Similarly, you want to designate the node Hokuspokusinae
as being possibly paraphyletic, so you select the Phylesis tool
and clicking on the node. Similarly, you want to designate the node Hokuspokusinae
as being possibly paraphyletic, so you select the Phylesis tool
 ,
click on the Hokuspokusinae node, and choose monophyly uncertain
from the drop-down list. One of your nodes (Paleocritterus)
is extinct, so you designate it as such with the Extinct Node
tool
,
click on the Hokuspokusinae node, and choose monophyly uncertain
from the drop-down list. One of your nodes (Paleocritterus)
is extinct, so you designate it as such with the Extinct Node
tool  .
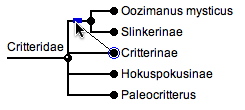
Finally, the phylogenetic position of Paleocritterus
is uncertain, so you select the Confidence of Placement tool
.
Finally, the phylogenetic position of Paleocritterus
is uncertain, so you select the Confidence of Placement tool
 ,
click on the node, and choose incertae sedis position unspecified
from the drop-down list. You should now have a tree that looks as follows:
,
click on the node, and choose incertae sedis position unspecified
from the drop-down list. You should now have a tree that looks as follows:
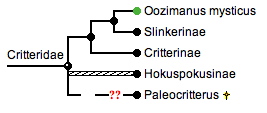
Note that the Critteridae node has a little white dot in it  .
This means that there is already a page attached to this node. If you
wanted to create new pages for additional nodes in your tree, you could
do so by using the Add Page tool
.
This means that there is already a page attached to this node. If you
wanted to create new pages for additional nodes in your tree, you could
do so by using the Add Page tool  .
For an overview of the function of all the different buttons in TreeGrow's
Tree Window toolbar, have a look at the Tree
Window Tools page.
.
For an overview of the function of all the different buttons in TreeGrow's
Tree Window toolbar, have a look at the Tree
Window Tools page.
Uploading the Tree to the ToL Development Site
 You
are now finished building your tree, and it's time to upload it to the
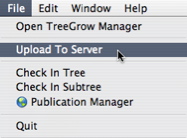
ToL Development Database. Go to TreeGrow's
File menu and select Upload To Server. When the upload
is finished, a dialog box will appear asking if you would like to preview
the changes you have made in your web browser. If you decide to preview,
TreeGrow will launch your default web browser
and load the version of the Critteridae page that is located on the ToL
Development Site. This site is password protected, so people's work
in progress is not available to the public. When you access the site for
the first time, TreeGrow will log you in automatically,
and a cookie will be stored on your computer that will give you automatic
access on return visits. Also, if you would like to show your page to
colleagues or collaborators, feel free to share the access information
provided in TreeGrow's dialog box with them.
(You can also find the information in TreeGrow's Help
menu under Previewing ToL Pages.)
You
are now finished building your tree, and it's time to upload it to the
ToL Development Database. Go to TreeGrow's
File menu and select Upload To Server. When the upload
is finished, a dialog box will appear asking if you would like to preview
the changes you have made in your web browser. If you decide to preview,
TreeGrow will launch your default web browser
and load the version of the Critteridae page that is located on the ToL
Development Site. This site is password protected, so people's work
in progress is not available to the public. When you access the site for
the first time, TreeGrow will log you in automatically,
and a cookie will be stored on your computer that will give you automatic
access on return visits. Also, if you would like to show your page to
colleagues or collaborators, feel free to share the access information
provided in TreeGrow's dialog box with them.
(You can also find the information in TreeGrow's Help
menu under Previewing ToL Pages.)
If you want to make changes to the tree you have uploaded, you can return to TreeGrow, edit the tree structure or taxon properties, and then upload again. Especially if you are creating a large tree, it's generally a good idea to upload changes to the ToL Development Database frequently while you are adding nodes and building the tree. Uploading creates a backup of your work on the ToL server, and you can get an idea of what your tree will look like on the branch pages you create.
Once you are satisfied with the tree structure you have created, it's time to check in the Critteridae branch (select Check in file from TreeGrow's File menu), quit TreeGrow, and switch to the ToL Web Tools in order to add some content to the Critteridae page.
Step 3: Develop a Branch Page
Getting Started with the ToL Web Tools
To begin working on the Critteridae branch page, you first need to access the page on the ToL Development Site. There are a number of different ways to get there:
- From TreeGrow (you will automatically
be logged in by the application):
- Do an upload and then preview your changes in your web browser, or
- Select the Edit Online tool
 ,
and click on the Critteridae node.
,
and click on the Critteridae node.
- From your web browser:
- Go straight to the ToL
Development Site Home Page, and navigate to the page
for your group. You can also create bookmarks in your browser
for your favorite pages.
- If you are working on a computer that does not already have the ToL Development Site cookie, you may be taken to a log-in page before you can view any pages on the ToL Development Site. Log-in with your personal username and password and proceed to the page you want to work on.
 If
your computer has the ToL Development Site
cookie, you can use the blue log-in button at the
top right of the page to log in with your personal
username and password.
If
your computer has the ToL Development Site
cookie, you can use the blue log-in button at the
top right of the page to log in with your personal
username and password.
- Go straight to the ToL
Development Site Home Page, and navigate to the page
for your group. You can also create bookmarks in your browser
for your favorite pages.
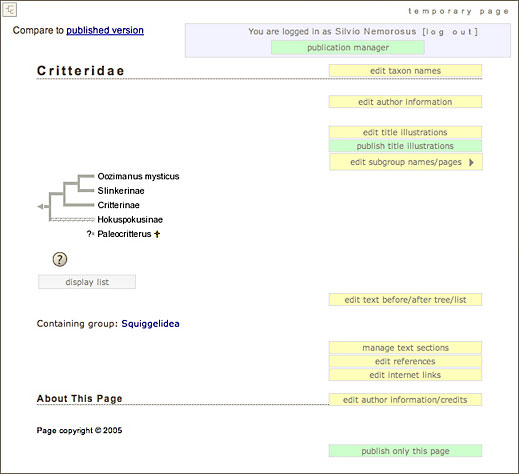
Once you are logged in on a page for which you have editing privileges (see Step 1), you will see a series of buttons along the right edge of the page that provide access to forms that will let you edit different sections of the page.
Creating a Text Section
Let's begin adding content to the Critteridae page by entering some text describing the group. Click on the manage text sections button. A new browser window will now open with a form that features a list of text sections. Since the Critteridae page does not yet have any text sections, only the standard ToL branch page sections are listed.
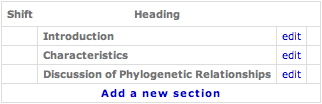
Click on the edit link for the Introduction, and you will be taken to another form that features a text editor in which you can enter text for the Introduction.
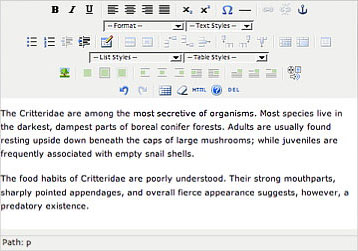
You have the option to use the editor either in Easy Mode (the
default) or in Advanced Mode. In Easy Mode, the text
editor provides a wysiwyg (what
you see is
what you get,
pretty much anyway) interface, and your entries will automatically
be formatted into paragraphs whenever you hit the return key. Also, you
can format your text and insert images  ,
links
,
links  ,
tables
,
tables  ,
etc. by clicking on the buttons in the toolbar at the top of the editor.
In Advanced Mode, the text editor provides a plain text interface
that allows you to enter raw HTML code.
,
etc. by clicking on the buttons in the toolbar at the top of the editor.
In Advanced Mode, the text editor provides a plain text interface
that allows you to enter raw HTML code.
Note: The Easy Mode text editor is still under development, so bear with us as we fix bugs and add more formatting options. If you want to take advantage of this feature, we recommend that you use the Firefox web browser to edit your pages (free download, available for Windows, Mac OS X, and Linux). The editor also works fairly well in Internet Explorer 6 on Windows, but you may notice some problems, especially when trying to use some of the image formatting buttons. The Easy Mode text editor does not currently work in Safari or in Internet Explorer on Mac OS.
Let's see what the new text for the Introduction will look like
on the Critteridae branch page. Click on the View Page button  in the right sidebar of the Edit Critteridae Introduction form.
This will take you back to the browser window with the Critteridae branch
page, and the updated version of this page is loaded featuring a new Introduction.
in the right sidebar of the Edit Critteridae Introduction form.
This will take you back to the browser window with the Critteridae branch
page, and the updated version of this page is loaded featuring a new Introduction.
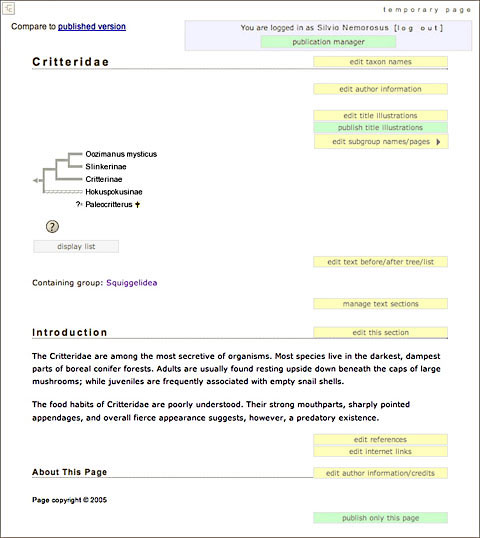
Note how there's an edit this section link next to the Introduction header. You can now simply click on this link if you want to make changes to the Introduction.
Adding Author Information
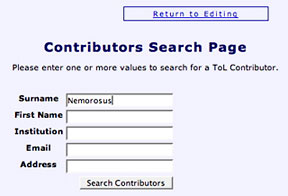
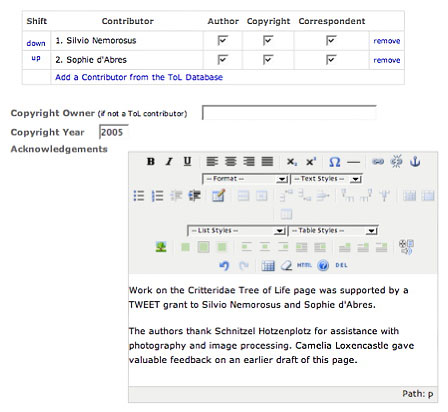
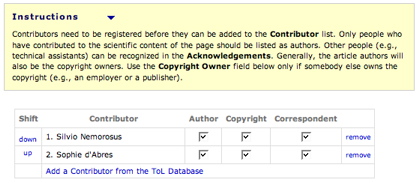
Now it's time to give credit to the author(s) of the page. Click on the edit author information button to go to the Edit Critteridae Page Authors/Credits form. Click on the Add a Contributor from the ToL Database link to add the first author.

This will take you to a form that lets you search for a contributor by name or a variety of other criteria. Once you have located the contributor you want to add, click on the select link next to that person's listing...
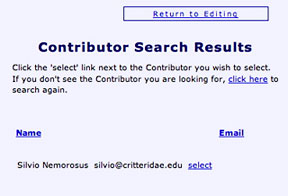
... and the person you selected will be added to the Contributor list. If there are additional authors, you can repeat the process. Also, if you would like to acknowledge other people or institutions that have contributed to the page, you can do so in the Acknowledgements text editor.
Note: The Contributors Search will let you add any registered ToL scientific core contributor to the authors list for your page. If you would like to add a contributor who is not yet registered, you can either send a request for registration to or you can register the person yourself by entering their name, email address, group assignments, etc. in TreeGrow's Contributors window, which is available in the Window menu. Tools for registering new authors on the web will become available soon. We just haven't had the time to build them yet.
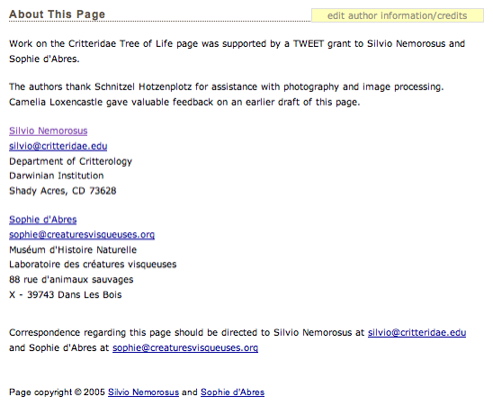
When you click on the View Page button
in the right sidebar of the Edit Critteridae Page Authors/Credits
form, you'll be taken to an updated version of the Critteridae page, which
now features acknowledgements and information about authors in the About
This Page section. The authors' addresses, emails, and homepage urls
are retrieved from the registration data in the ToL database, so you don't
have to worry about entering these data once a person has been registered.
Adding Title Illustrations
As our final task, let's add some title illustrations to the Critteridae page. Click on the edit title illustrations button to open the Edit Critteridae Title Illustrations form; then click on the Add the first image to the title illustration array link. This will lead you to a page where you can either
- Search the ToL database for an image to use as a title illustration
- Add a new image to the ToL database
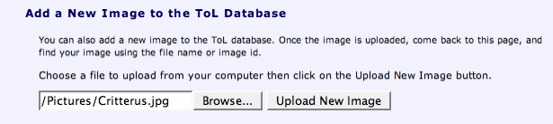
Let's say you want to use one of your own images, which is not yet in the ToL image database. Since any image used on a Tree of Life page must first be uploaded to the ToL image database, you go to the Add a New Image to the ToL Database section. Click on the Browse... button (Choose File in some browsers) and locate the image file you want to upload from your computer. Once the path to your file is shown next to the Browse... button, select Upload New Image.
Your image will now be uploaded to the ToL database (if nothing happens, you probably clicked on the Upload button before selecting an image), and you are presented with a new window titled Edit Image Data. Here you can enter information about the image. This information will then be used to autogenerate captions when the image is displayed on the ToL web site. You don't have to fill out every field in this form; different fields will be relevant for different images. Fields that are of general importance have titles printed in red.
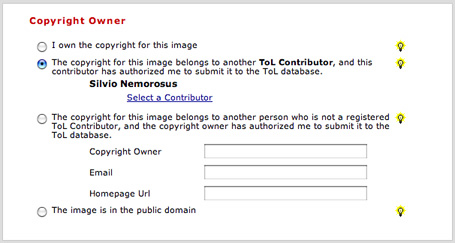
By default, the system will assume that you are the copyright owner for the images you upload. If you are not the copyright owner, you need to change the information in the Copyright Owner section. If the copyright owner is a registered ToL contributor, you can follow the Select a Contributor link and locate the person or institution in the ToL database. The uploaded image will then be linked to the ToL contributor's record, and the copyright owner will automatically have editing access to the image. If the copyright owner is not a registered ToL contributor, you can type their name, email address, and homepage URL in the fields provided.
Also, each image in the ToL collection should be attached to a group. It is best to attach an image to the most specific taxonomic level possible. For example, if you were to upload an image of a specimen of Critterus happygoluckii, you would attach it to the subfamily Critterinae, because the Critterus happygoluckii node is not yet represented in the ToL database. To attach the image to Critterinae, select the link Add Group under the Attached to Group(s) heading, then enter Critterinae in the search field, and select Critterinae from the search results. The image is now attached to the Critterinae node.

To save the image data in the Tree of Life database, click on the Submit Image Data button on the bottom of the form. You then get a chance to review the information you have entered in a caption table. If everything looks correct, click on Accept Image Data. Now your image is in the ToL database and ready to be used on your ToL page.
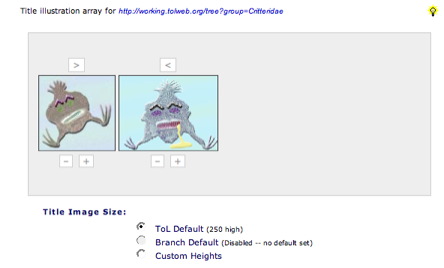
When you close the Edit Image Data window, the Edit Critteridae Title Illustrations form will still be open in another window in your browser, and you should now see the thumbnail of the image you have just uploaded in the title illustrations array. There will also be a – button that lets you remove the image from the array and a + button that lets you add more images.
Click on the + button to add another image to the array. This time, you will use the upper part of the Add a Title Illustration form to add an image that's already in the ToL database. You can use a number of different criteria to find a suitable image. The Attached to Group field will already be filled out with the name of the group for which you are creating the title illustrations array. If you want to narrow down your search to a particular subgroup, you can change this entry, and you can also add other search criteria.
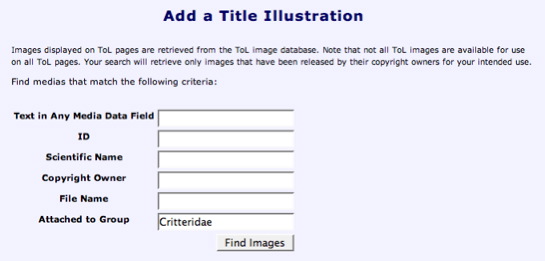
After you click on Find Images, you will get a page with a list of thumbnails of all the images in the ToL database that match your search criteria. Select the image you want to use, and it will be added to the array in the Edit Title Illustrations form. Above the thumbnails for the title illustrations, you will now also find buttons that let you manipulate the sequence of pictures in the array.
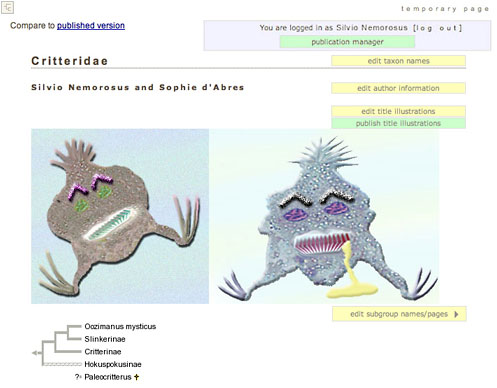
Now it's time to have a look at what the title illustrations will look
like on the Critteridae page. Click on the View Page button
in the right sidebar, and you'll be taken to an updated version of the
Critteridae page, which now features the two title illustrations at the
top.
Also, by default the image data for each image are printed as captions along with thumbnails at the bottom of the Critteridae page. If you would like to substitute or supplement these autogenerated captions with a custom caption, you can return to the Edit Critteridae Title Illustrations form, and enter the custom caption into the text field in the Captions for Title Illustrations box. Make sure to select the Display Custom Caption check box. When you now view the page, your custom caption will appear above the thumbnails at the bottom of the Critteridae page.
Step 4: Submit Your Work for Publication
 Let's
say we are now ready to have our work published on the official ToL web
site. Since you have only worked on a single page, the easiest way to
have it submitted for publication is to go to the very bottom of the page
and to click on the publish only this page
button. The page will then reload, featuring a message box cofirming your
submission.
Let's
say we are now ready to have our work published on the official ToL web
site. Since you have only worked on a single page, the easiest way to
have it submitted for publication is to go to the very bottom of the page
and to click on the publish only this page
button. The page will then reload, featuring a message box cofirming your
submission.
Submitting a page for publication will lock it, so it cannot be edited by anybody except the reviewing ToL editor. At the same time, the ToL managing editor receives a request to review and publish the page. The editor may get back to you and request changes, or she may go ahead and publish your page on the public ToL web site. Once the page is published, it can be edited again on the ToL Development Site.
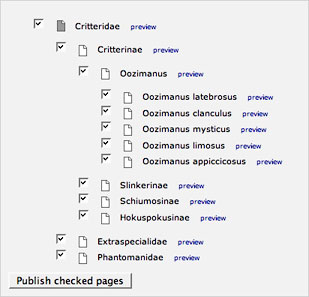
If you have developed a group of pages, rather than a single page, submitting each of the pages for publication separately can become quite tedious. In this case, it would be a good idea to use the publication manager, which can be accessed in a variety of ways including a button in the upper right corner of the page on the ToL Development Site. The Publication Manager gives you an overview of all the pages that you have worked on and that have not yet been published. You can then decide whether all of these pages are ready for publication, in which case you leave all of them checked (the default status), or you can uncheck pages that still need some work and that should not yet be published. When you click on the Publish checked pages button, all the checked pages will be submitted to the ToL managing editor for publication.
You have now built a simple page in TreeGrow and the ToL Web Tools, including a phylogeny, some text, author information, and title illustrations. You should now be able to expand your knowledge of the ToL editing tools by exploring the options in the editing forms and by reading the information in the Instructions boxes provided in each form.
The content of these boxes is hidden by default, and you need to click in the box to make it visible.

Detailed instructions about individual features of the ToL data entry tools are also available in the Technical Reference.